I have to state that this post as all my other posts is based on my experience and is not a guide on "how to".
If anyone decides to use my method he will to do it on his on risk, I advice you read my site safety deceleration.
So lets get started: the most important part of running a homemade foundry is having all the necessary P.P.E. Always work with full body protective gear head to toe when handling molten metal never cut corners on this part. The main components for a homemade foundry are:
- All P.P.E designated for foundry to protect the metal caster from molten metal injuries.
- Well insulated foundry for example using an old gas cylinder, metal bin, flower pot etc'. When I say insulated I mean good refractory to keep all the heat in the furnace.
- Foundry energy source to heat the solid aluminum bringing it to 660°C (melting point). This could be achieved with charcoals + air blower, Gas burner, waste oil burner or an electric furnace. Every energy source has its advantages and disadvantages.
- Crucible is the container that holds the solid aluminum parts until it turns into molten metal. The foundry crucible has to be solid enough to withstand the high temperature without breaking. A bad crucible could result in loosing all the molten metal at the bottom of the furnace. There are different types of commercial crucibles such as clay graphite crucibles, silicon carbide crucibles, ceramic crucibles and more. I will focus on a homemade metal crucible.
- Foundry tools such as crucible lifting tool / tongs, crucible dross skimming spoon, water pump pliers.
- Ingot tray some sort of container that will hold the left over aluminum from every casting. It is possible to use a metal muffin tray to get nice and neat ingots or to weld L bars for larger ingots (easy solution for stacking).
- Molding sand either green sand or oil bonded sand. Both are good for casting aluminum parts.
- Foundry flask for sand casting, either from timber or metal is good as long as the cope and drag parts align.
- Aluminum source there are many objects around us made of aluminum that can easily be melted and recycled into a new object. A good source of aluminum could be found in car engine parts such as an engine block, bell housing etc'.
 |  |
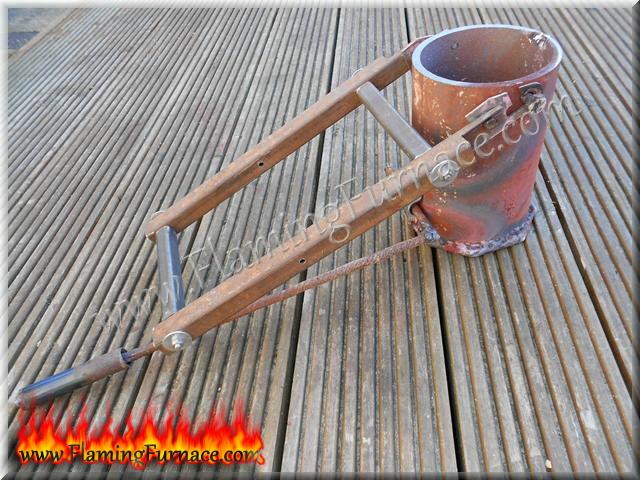
I used old scrap metal from a broken scooter to make all the crucible lifting tools.
The only part I purchased from a metal fabricator factory was a metal pipe size: 140mm-Diameter and 8mm-thickness. I asked the guy in the factory to cut two sizes one: 200mm (H) the other 110mm (H). Its more convenient to use smaller crucibles for small casting projects. I also bought a metal base plate 5mm -thick for the crucible. I cut the metal plate with an angle grinder into a octagon shape that way it fit nicely into the foundry cavity. I also threaded two bolts into the sides of the crucible to be used with the crucible lifting tool.
 |  |  |  |  |
The lifting tool is constructed from an old scooter and square iron tube and the tilting handle I made by welding a re-bar into an L-shape.
 |  |  |  |  |  |
After making the lifting tools its important to check that they work well ,for example lifting the crucible in and out of the foundry checking that nothing gets in the way. Its also very important to make sure that while lifting the crucible and tilting the crucible that it won't fall out of the lifting tool notches. The last tool and the most easiest one to make is the foundry skimming tool. Its always good practice to make a long handle for the skimming spoon. I made my skimming spoon from a metal rod and I welded to it a large kitchen spoon.
 |  |  |  |  |  |
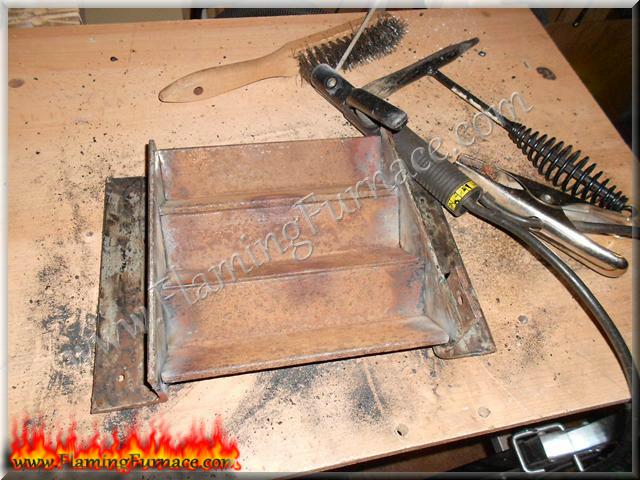
This metal crucible is excellent for backyard metal casting, I have used it many times and it works perfect in combination with the crucible tools. The next thing I needed is a good and functional ingot tray. Since I am using bigger crucible I am using more aluminum and the muffin tray that I used before is a bit small at this stage. Ingot tray size can vary depended on the size of the foundry and the volume of the castings. The new Ingot tray I made from welded L-bars. The triangular aluminum ingots make it easy to stack pile them. It is very important to preheat the ingot tray during every casting session just before pouring the molten metal into it. I usually place the ingot tray on top of the hot foundry for a few minutes before pouring the molten metal into it.
 |  |  |  |  |  |  |
I still didn't have time to finish my aluminum flask project at the moment I have only 4 parts complete and I have to sand cast 4 more. A good solution for temporary flask or just a cheap foundry flask is to make it out of timber. The flask could be made from scrap timber as long as the cope and drag of the flask align together. The size of the flask depends on the size of the object to be casted. Just remember the bigger the flask is the more casting sand and weight you will have to take into consideration. For large wood flask it's recommended to create some sort of ribs inside the flask either by nailing some sort of strip or to make grooves in the inside of the flask. What ever works is good if it keeps the sand in the flask ;-)
 |  |  |  |  |  |


