Welcome to my FlamingFurnace, backyard metal casting blog.

Hi everyone, I mainly focus on metal casting projects using recycled scrap aluminum and other accessories in the pattern creations.
Aluminum is a very versatile material and I would like to promote the awareness of aluminum recycling via different metal casting projects.

Feel free to check my YouTube channel where I provide detailed explanations, tips & tutorials for best backyard aluminum casting methods, homemade foundry equipment & of course the importance of safety when working with molten aluminum.

So remember recycle and Enjoy my blog ;-)
Showing posts with label backyard foundry. Show all posts

July 21, 2022

Photogrammetry into 3D Print => Into a Solid Aluminum Metal Casting

I have experimented the first time with lost PLA metal casting, I used as always recycled aluminum scrap for this project, I created in the past two 3D printings using photogrammetry method of two statues, since then I created various sizes of the statues 3d printings but always wanted to have them made from a more solid material such as metal.

You are welcome to view my YouTube video of the metal casting creation from start to finish ;-).

Using Photogrammetry Method Transforming Images into a 3D Printed Object

I started by using photogrammetry method taking around 80 images of each of the objects that I planned to turn into metal the main software I worked with was Autodesk ReCap Photo, once the stage of meshing and texturing was complete I did the final touches of removing additional backgrounds and cosmetic fixing's to the object surface. The next step was to upload the files to Ultimaker Cura 3d printing software and test some real 3d prints.

In the images you can see the stages of the Photogrammetry preparation, both for the owl statue and for the crying statue (AKA - The Legend of the Yogi Man - "Orang Malu").


Photogrammetry into 3D Print


Photogrammetry into 3D Print


3D Printing of the 2 Statues for the Lost PLA Metal Casting

I decided to make an experiment with four hollow 3d printed patterns, x2 in 2mm shell thickness and x2 in 1mm shell thickness. I wanted to experiment if there will be any difference in the aluminum casting details and my assumption was correct where the two 2mm aluminum casting failed while the other two in 1mm turned out much more successful, both not perfect but looking great for the first lost PLA test. I also learned that with lost PLA casting its important to extend the 3D printing and add an additional 1cm base to the object as the PLA rise up once the molten aluminum is poured and in my casting I lost 1cm in height vs the original 3D printing.

Photogrammetry into 3D Print

Photogrammetry into 3D Print

Testing x4 3D Printings for Aluminum Metal Casting

I was not sure if the 1mm thickness printing would have turned-out without inner filament support but to my surprise it turned out very well, I have changed the setting in Cura for the thickness of the external shell and 0% infill for all of the four printings.

3D Print

3D Print

Using Oil Bonded Sand for the 3D Print Metal Casting

I used my very old but still usable Petrobond (Oil bonded sand) and buried the four 3D printings in the sand, next I used my mini soldering torch to start the hole at the base where the molten aluminum was to be poured into, the idea was to try and remove some of the PLA hoping it would reduce some of the casting defects as the PLA floats up once the molten aluminum is poured into it.


The Aluminum Metal Casting Experiment - Success and Failure

I used my good old furnace and melted some recycled scarp aluminum, after degassing and removing the impurities I have poured the molten aluminium into the four sand mould cavities. After it cooled down a bit I removed the fresh aluminum castings from the sand and was surprised that my assumption was correct and the 1mm in thickness 3D printing's turned out well while the 2mm thickness failed. In the images you can see the difference before the final aluminum cleanup and light polish.
Aluminum metal casting


aluminum metal casting

 Aluminum Casting Clean Up and Light Polish

I use a saber saw to cut off the extra aluminum base and an angle grinder to clean and flat the base. After I gave the aluminum casting some light clean up and buffing.


The 3D Printing and the Final Aluminum Metal Casting

The final project result below, I will probably try at some point in the future to create a larger metal casting of a 3D printing Yogi Man ;-) and add additional base to fix/compensate of the couple of mm's missing at the bottom of the metal casting.

3D print and aluminum metal casting

3D print and aluminum metal casting


August 14, 2021

 Turning A Cheap Axe into a Viking Style Axe

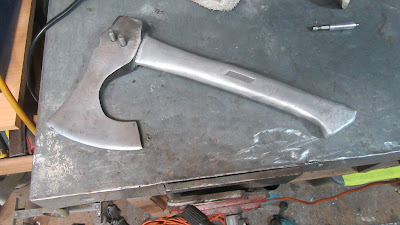
I just posted a new video where I took an old axe and turned it into a cool looking Viking axe style, I have used first time metal etching in this project, and sand casting to create the new solid aluminum handle. As always all the aluminum used is from recycled old parts, Feel free to check my YouTube video below with all the steps and don't forget to tap on like, subscribe or just leave a comment ;-).


The first step was to create the new Viking axe design, I used basic material's to create the shape such as WD40 metal can, duct tape roll and T-Pex pen pen to mark the lines. I have also removed the old handle easily by drilling the axe head. 

Step 1: designing the Viking axe shape
Making a Viking axe style from a cheap axe/hatchet

Step 2: removing the old cheap handle

Step 3: using and angle grinder cutting the shape of the Viking axe

Once the shape was cut with an angle grinder I did some sanding with a flap disc and sand paper

Step 4: Oil heat treatment of the Viking axe head, for extra strength and durability

Step 5: creating the sand mold and casting the aluminum into a sand mould with the Viking axe head inside. The aluminum casting turned out very well just required some light cleanup ;-).

 Step 6: To create extra support of the axe head to the new casted aluminum handle I used my bench drill, drilling two holes and welding x2 metal pins for extra strength, then cleaned the surface with angle grinder and you could never guess there are 2 pins welded
Making a Viking axe style from a cheap axe/hatchet and aluminum handle casting

After the metal pins welding and cleanup on both sides
Making a Viking axe style from a cheap axe/hatchet

Step 7: I used metal etching with a 12V car battery charger, salt and lemon to create two words in (ancient Paleo (1200BC) Wiki) - one words refers to "Good" and the other word "Evil", I thought its symbolic as an axe can be used as a weapon in times of war and other times just for survival/camping to chop wood. I used electrical tape and Tipp-ex pen to create the words and shapes across the Viking axe head.


Metal etching with basic materials


First look after short etching, this was just my first test next time I might do deeper metal etching

Step 8: After a bit of aluminum polish I used a Paracord to wrap around the axe handle (simple west country whipping) and lastly sharpened the axe blade a bit, and that's it turned out very cool ;-).


Ready to chop some wood


October 30, 2018

Styrofoam skulls into solid aluminum - (Lost Foam Casting) ♻


In this video/tutorial I created a solid aluminum wreath skulls for Halloween, I used the Lost Foam casting method with my home made furnace to make the aluminum casting, the process is super simple and the preparation of the casting mold is very quick.

As always I am recycling ♻ old aluminum scrap into something new, most important is promoting the recycling awareness by providing different ideas for projects. 

Halloween Skull decoration into solid aluminum - Lost Foam Casting ♻

In this tutorial video you can learn how to create your own aluminum skull-bones ☠️ decoration for Halloween or just for the fun of it, ;-)

As always I am recycling old scrap aluminum into something new, most important is promoting the recycling awareness by providing different ideas for projects ♻

Special Zombie Apocalypse - Spike Ball Aluminum Lost Foam Casting

Spike ball for zombie apocalypse - In this video I will show you the stages of how I made an aluminum spike ball using lost foam casting method. The aluminum casting turned out very well and surprisingly ;-), the handle is made from scrap metal such as bolt, nuts metal loop and old fishing chain.
As always I am recycling old scrap aluminum into something new, most important is promoting the recycling awareness by turning this waste into something new. I hope you enjoy the video feel free to like subscribe or drop me a comment ;-)

Silly Paper Weight - Lost Foam Aluminum Casting

This is a short video of my lost foam aluminum casting experiment, I just glued some art and craft Styrofoam ball I found in a local craft shop. This silly project gave me idea for my next video - coming up soon demonstrating how to cast solid aluminum medieval spiked ball. As always all my metal casting projects are made from recycled aluminum, the main purpose of my videos is to increase recycling awareness. I hope you enjoy the video feel free to like subscribe or drop me a comment.

July 26, 2016

Solid aluminum pistol casting from recycled scrap aluminum.

This is the 1st part of how to cast a solid aluminum pistol using a homemade furnace and recycled scrap aluminum.

This is the 2nd part of how to cast a solid aluminum pistol using a homemade furnace and recycled scrap aluminum.